
처음부터 차근차근
리스너 객체 본문
EditText 이벤트 처리 - 리스너 객체 사용
<?xml version="1.0" encoding="utf-8"?>
<LinearLayout xmlns:android="http://schemas.android.com/apk/res/android"
xmlns:app="http://schemas.android.com/apk/res-auto"
xmlns:tools="http://schemas.android.com/tools"
android:layout_width="match_parent"
android:layout_height="match_parent"
android:orientation="vertical"
tools:context=".MainActivity">
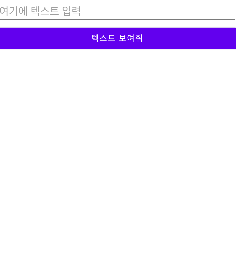
<EditText
android:id="@+id/editTest"
android:layout_width="match_parent"
android:layout_height="wrap_content"
android:hint="여기에 텍스트 입력"
android:inputType="number" />
<Button
android:id="@+id/btnTest"
android:layout_width="match_parent"
android:layout_height="wrap_content"
android:text="텍스트 보여줘" />
</LinearLayout>public class MainActivity extends AppCompatActivity {
@Override
protected void onCreate(Bundle savedInstanceState) {
super.onCreate(savedInstanceState);
setContentView(R.layout.activity_main);
EditText editText = findViewById(R.id.editTest);
Button button = (Button) findViewById(R.id.btnTest);
button.setOnClickListener(new View.OnClickListener() {
@Override
public void onClick(View view) {
String str = editText.getText().toString();
Toast.makeText(MainActivity.this, "입력값 : " + str, Toast.LENGTH_SHORT).show();
}
});
}
}
체크박스 이벤트 처리
public class MainActivity extends AppCompatActivity {

    @Override
    protected void onCreate(Bundle savedInstanceState) {
        super.onCreate(savedInstanceState);
        setContentView(R.layout.activity_main);


    }
    public void onCheckboxClicked(View view) {
        boolean checked = ((CheckBox)view).isChecked();
        switch (view.getId()) {
            case R.id.checkbox_meat:
                if (checked) Toast.makeText(this, "고기선택", Toast.LENGTH_SHORT).show();
                else Toast.makeText(this, "고기선택해제", Toast.LENGTH_SHORT).show();
                break;
            case R.id.checkbox_cheese:
                if (checked) Toast.makeText(this, "치즈선택", Toast.LENGTH_SHORT).show();
                else Toast.makeText(this, "치즈선택해제", Toast.LENGTH_SHORT).show();
                break;

        }
    }
}
<?xml version="1.0" encoding="utf-8"?>
<LinearLayout xmlns:android="http://schemas.android.com/apk/res/android"
xmlns:app="http://schemas.android.com/apk/res-auto"
xmlns:tools="http://schemas.android.com/tools"
android:layout_width="match_parent"
android:layout_height="match_parent"
android:orientation="vertical"
tools:context=".MainActivity">
<CheckBox
android:id="@+id/checkbox_meat"
android:layout_width="wrap_content"
android:layout_height="wrap_content"
android:text="고기"
android:onClick="onCheckboxClicked" />
<CheckBox
android:id="@+id/checkbox_cheese"
android:layout_width="wrap_content"
android:layout_height="wrap_content"
android:text="치즈"
android:onClick="onCheckboxClicked" />
</LinearLayout>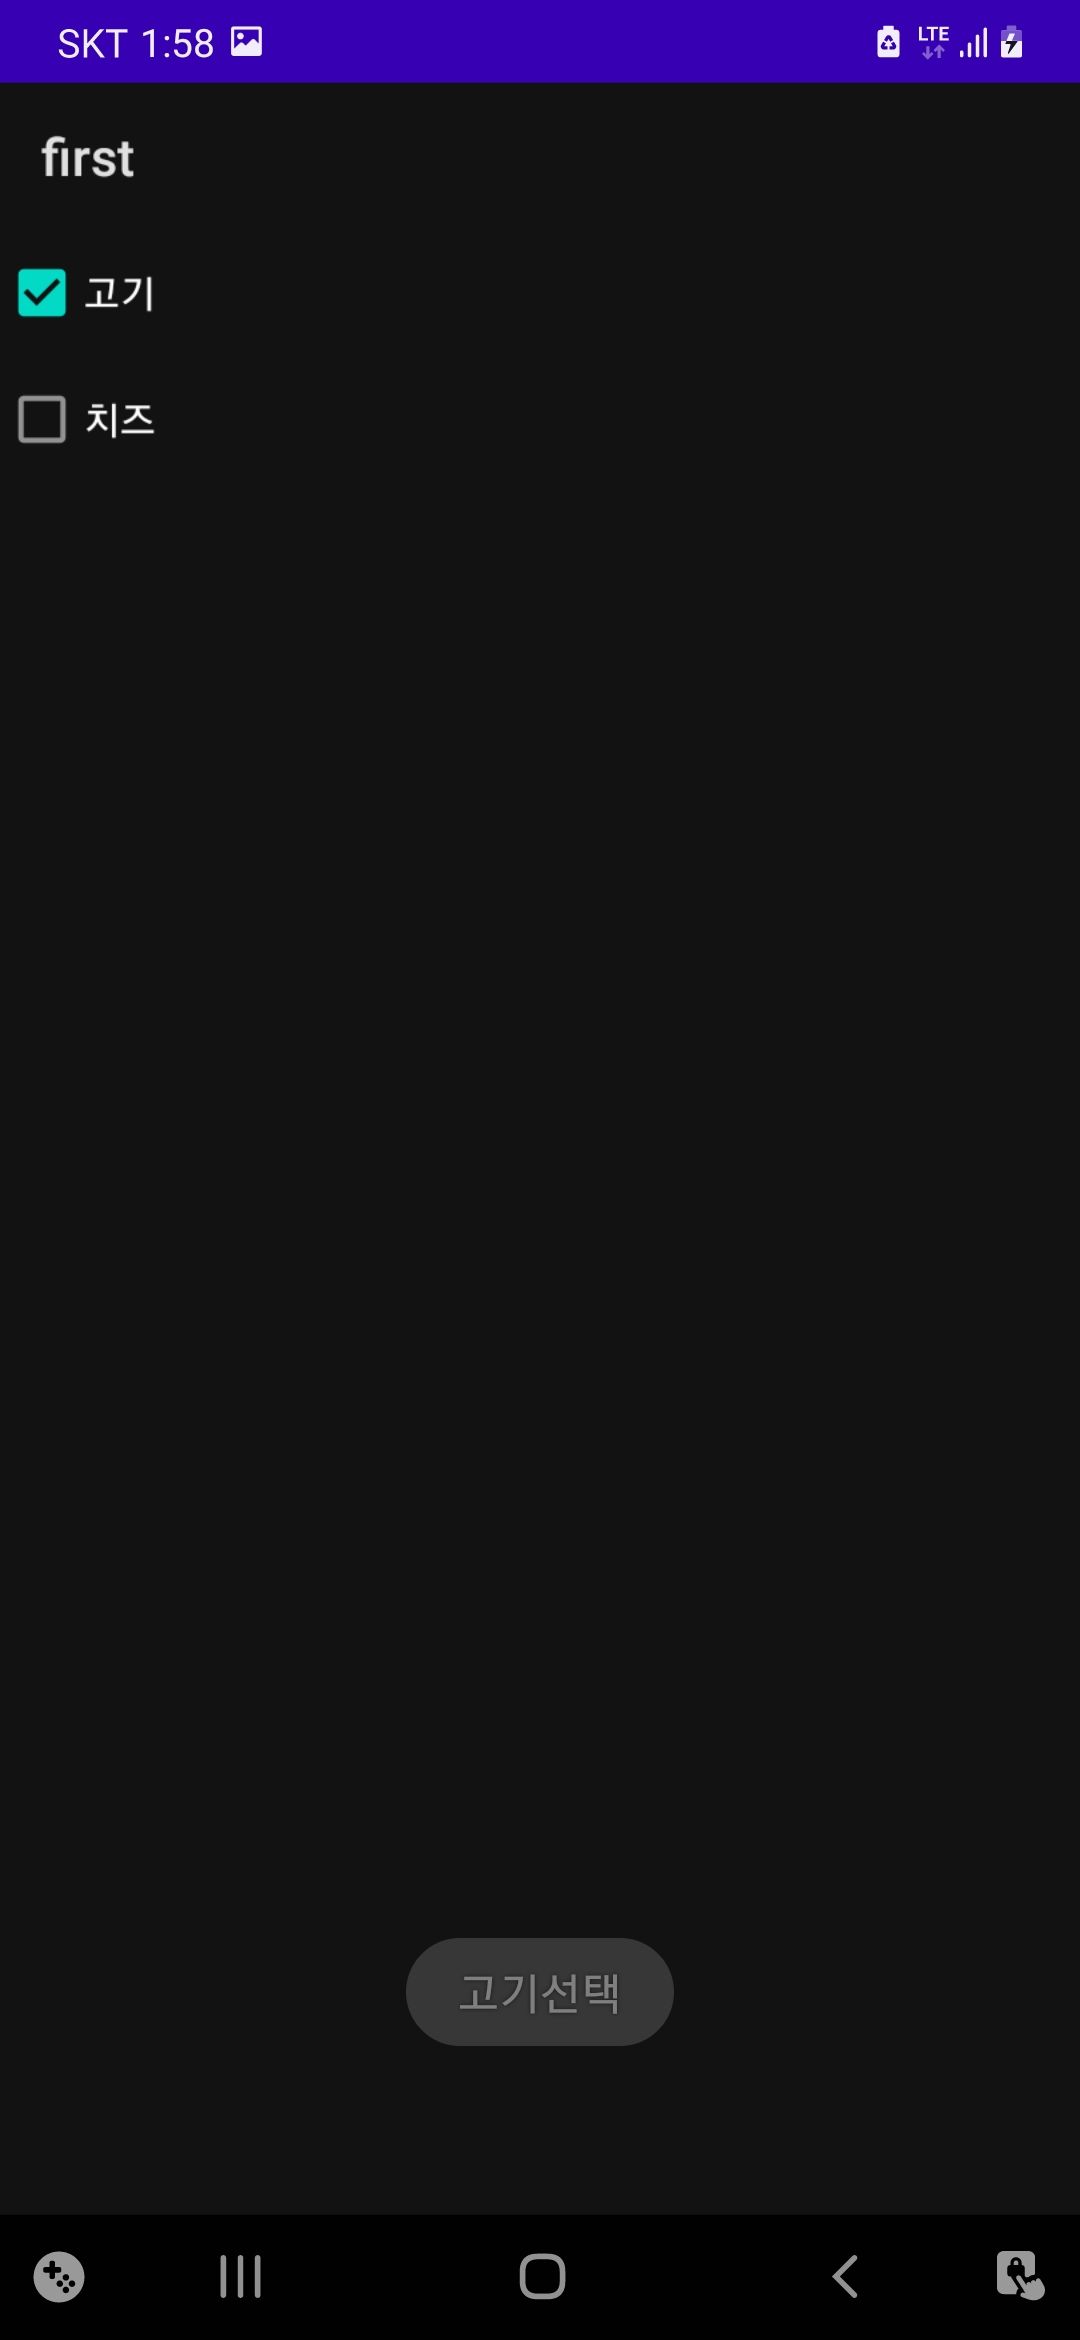
라디오 버튼 이벤트 처리
<?xml version="1.0" encoding="utf-8"?>
<LinearLayout xmlns:android="http://schemas.android.com/apk/res/android"
    xmlns:app="http://schemas.android.com/apk/res-auto"
    xmlns:tools="http://schemas.android.com/tools"
    android:layout_width="match_parent"
    android:layout_height="match_parent"
    tools:context=".MainActivity">

    <RadioGroup
        android:layout_width="match_parent"
        android:layout_height="wrap_content"
        android:orientation="vertical">
        <RadioButton
            android:id="@+id/radio_red"
            android:layout_width="wrap_content"
            android:layout_height="wrap_content"
            android:onClick="onRadioButtonClicked"
            android:text="Red"/>

        <RadioButton
            android:id="@+id/radio_blue"
            android:layout_width="wrap_content"
            android:layout_height="wrap_content"
            android:onClick="onRadioButtonClicked"
            android:text="Blue"/>
    </RadioGroup>

</LinearLayout>
public class MainActivity extends AppCompatActivity {
@Override
protected void onCreate(Bundle savedInstanceState) {
super.onCreate(savedInstanceState);
setContentView(R.layout.activity_main);
}
public void onRadioButtonClicked(View view) { // 추가
boolean checked = ((RadioButton) view).isChecked();
switch (view.getId()) {
case R.id.radio_red:
if (checked)
Toast.makeText(getApplicationContext(), ((RadioButton) view).getText(), Toast.LENGTH_LONG).show();
break;
case R.id.radio_blue:
if (checked)
Toast.makeText(getApplicationContext(), ((RadioButton) view).getText(), Toast.LENGTH_LONG).show();
break;
}
}
}
토글 버튼 이벤트 처리
public class MainActivity extends AppCompatActivity {

    @Override
    protected void onCreate(Bundle savedInstanceState) {
        super.onCreate(savedInstanceState);
        setContentView(R.layout.activity_main);
    }
    public void onClicked(View view) {
        boolean cheked = ((ToggleButton)view).isChecked();
        if (cheked) Toast.makeText(this, "Checked", Toast.LENGTH_SHORT).show();
        else Toast.makeText(this, "UnChecked", Toast.LENGTH_SHORT).show();
    }
}
<?xml version="1.0" encoding="utf-8"?>
<LinearLayout xmlns:android="http://schemas.android.com/apk/res/android"
xmlns:app="http://schemas.android.com/apk/res-auto"
xmlns:tools="http://schemas.android.com/tools"
android:layout_width="match_parent"
android:layout_height="match_parent"
android:orientation="vertical"
tools:context=".MainActivity">
<ToggleButton
android:id="@+id/togTest"
android:layout_width="wrap_content"
android:layout_height="wrap_content"
android:textOn="Vibrate On"
android:textOff="Vibrate Off"
android:onClick="onClicked"/>
</LinearLayout>
레이팅 바
public class MainActivity extends AppCompatActivity {

    @Override
    protected void onCreate(Bundle savedInstanceState) {
        super.onCreate(savedInstanceState);
        setContentView(R.layout.activity_main);

        RatingBar ratingbar = (RatingBar) findViewById(R.id.ratingbar);
        ratingbar.setOnRatingBarChangeListener(new RatingBar.OnRatingBarChangeListener() {
            public void onRatingChanged(RatingBar ratingBar, float rating, boolean b) {
                Toast.makeText(getApplicationContext(),
                        "New Rating: " + rating, Toast.LENGTH_SHORT).show();
            }
        });

    }
}
<LinearLayout xmlns:android="http://schemas.android.com/apk/res/android"
xmlns:app="http://schemas.android.com/apk/res-auto"
xmlns:tools="http://schemas.android.com/tools"
android:layout_width="match_parent"
android:layout_height="match_parent"
android:orientation="vertical"
tools:context=".MainActivity">
<RatingBar
android:id="@+id/ratingbar"
android:layout_width="wrap_content"
android:layout_height="wrap_content"
android:numStars="6"
android:stepSize="0.5" />
</LinearLayout>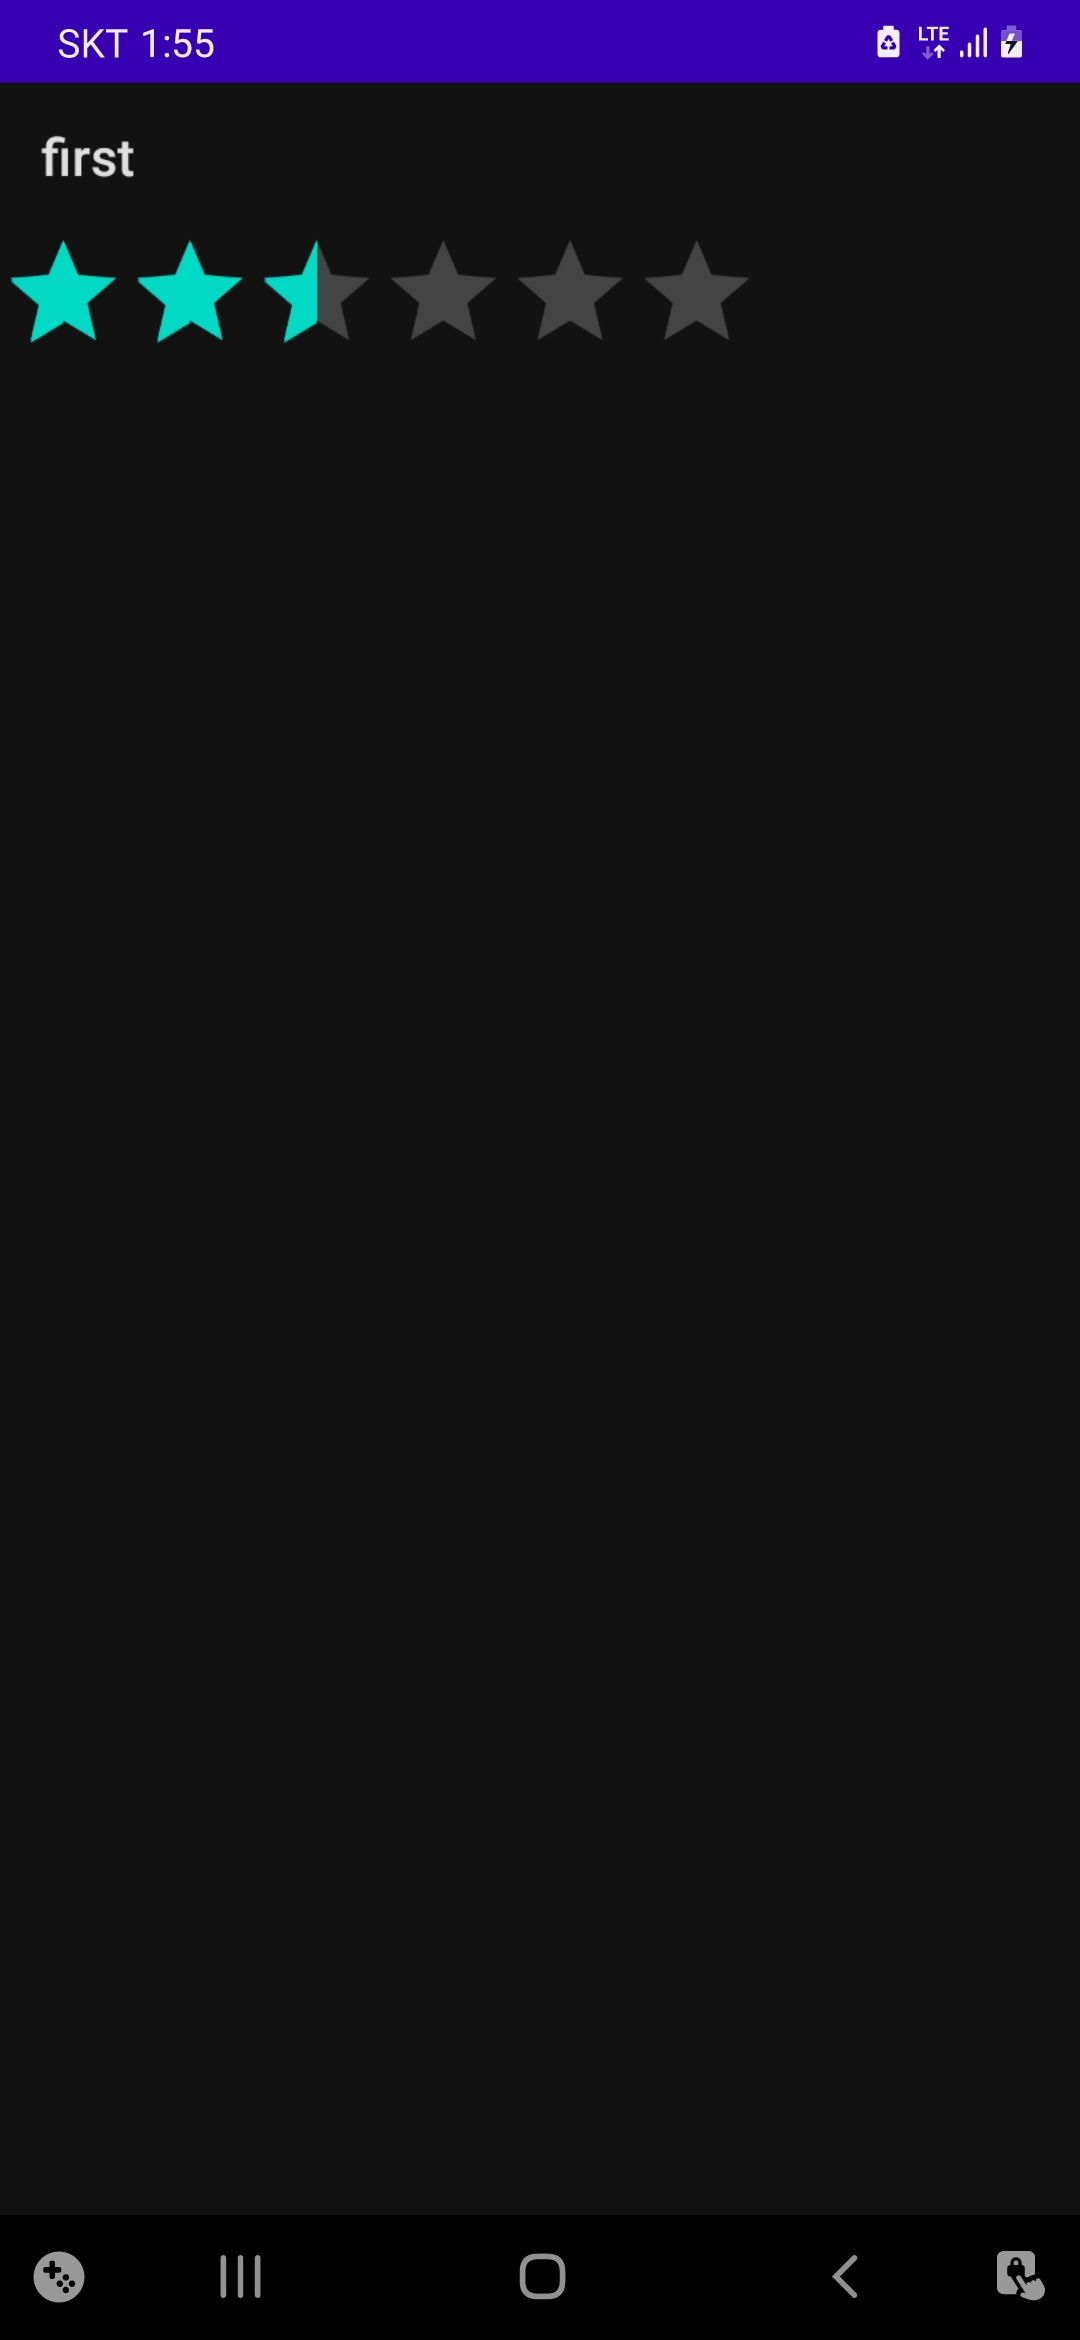
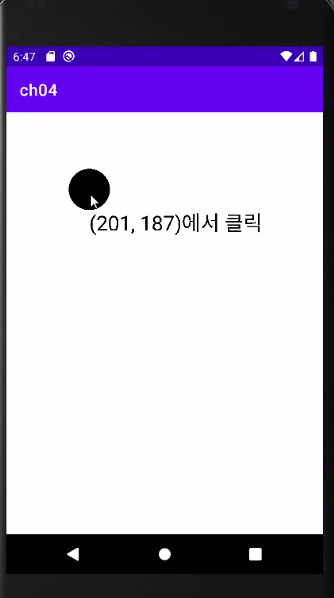
커스텀 컴포넌트
개발자가 직접 View 클래스를 상속받아서 필요한 위젯을 개발
MainActivity있는 곳에다 View를 새로 만든다.
public class MyView extends View {

    int x = 100, y = 100;

    public MyView(Context context) {
        super(context);
    }

    @Override
    public boolean onTouchEvent(MotionEvent event) {
        x = (int) event.getX();
        y = (int) event.getY();

        invalidate(); // 처음부터 다시 그려주기

        return super.onTouchEvent(event);
    }

    @Override
    protected void onDraw(Canvas canvas) {
        Paint paint = new Paint(); // 붓
        paint.setTextSize(50);
        canvas.drawCircle(x, y, 50, paint);
        canvas.drawText("(" + x + ", " + y + ")에서 클릭", x, y + 100, paint);
    }
}
public class MainActivity extends AppCompatActivity {
@Override
protected void onCreate(Bundle savedInstanceState) {
super.onCreate(savedInstanceState);
//setContentView(R.layout.activity_main);
MyView myview = new MyView(this);
setContentView(myview);
}
}
커스텀 뷰
1. knob이미지 drawable 아래다 놓기
2. view 새로 만들기 (MainActivity있는 곳에다) view 이름: VolumeControlView
public class VolumeControlView extends androidx.appcompat.widget.AppCompatImageView implements View.OnTouchListener{

    private KnobListner listner;
    private float mx, my;
    private float x, y;
    private double angle = 0.0d;

    public VolumeControlView(@NonNull Context context, @Nullable AttributeSet attrs) {
        super(context, attrs);
        this.setImageResource(R.drawable.knob);
        this.setOnTouchListener(this); // 콜백
    }

    public interface KnobListner {
        public void onChanged(double angle);
    }

    public void setknobListner(KnobListner lis) {
        listner = lis;
    }

    private double getAngle(float x, float y) {
        mx = x - (getWidth() / 2.0f);
        my = (getHeight() / 2.0f) - y;

        double degree = Math.atan2(mx, my) * 180.0 / 3.141592;
        return degree;
    }

    @Override
    public boolean onTouch(View view, MotionEvent motionEvent) {
        x = motionEvent.getX();
        y = motionEvent.getY();

        angle = getAngle(x, y);
        invalidate();

        listner.onChanged(angle);

        return true;
    }

    @Override
    protected void onDraw(Canvas canvas) {
        Paint paint = new Paint();
        canvas.rotate((float) angle, getWidth() / 2, getHeight() / 2);
        super.onDraw(canvas);
    }
}
<?xml version="1.0" encoding="utf-8"?>
<LinearLayout xmlns:android="http://schemas.android.com/apk/res/android"
xmlns:app="http://schemas.android.com/apk/res-auto"
xmlns:tools="http://schemas.android.com/tools"
android:layout_width="match_parent"
android:layout_height="match_parent"
android:orientation="vertical"
tools:context=".MainActivity">
<com.example.aaa.VolumeControlView
android:id="@+id/custVolume"
android:layout_width="300dp"
android:layout_height="300dp"
android:layout_gravity="center"
/>
<RatingBar
android:id="@+id/ratingbarControl"
android:layout_width="wrap_content"
android:layout_height="wrap_content"
android:layout_marginLeft="13dp"
android:layout_marginRight="13dp"
android:layout_marginTop="20dp"
android:numStars="6"
android:stepSize="0.5" />
</LinearLayout>public class MainActivity extends AppCompatActivity {
@Override
protected void onCreate(Bundle savedInstanceState) {
super.onCreate(savedInstanceState);
setContentView(R.layout.activity_main);
VolumeControlView volumeControlView = (VolumeControlView) findViewById(R.id.custVolume);
RatingBar ratingBar = (RatingBar) findViewById(R.id.ratingbarControl);
volumeControlView.setknobListner(new VolumeControlView.KnobListner() {
@Override
public void onChanged(double angle) {
float rating = ratingBar.getRating();
Log.d("_______________", "각도 : " + angle);
if(angle > 0 && rating < 6.0) {
ratingBar.setRating(rating + 0.5f);
}
else if (angle < 0) {
ratingBar.setRating(rating - 0.5f);
}
}
});
}
}
출처 : 안드로이드프로그래밍(22-1학기)김용남교수 강의 내용 변형 및 요약
'프로그래밍 > Android' 카테고리의 다른 글
| 팝업 메뉴 (1) | 2022.04.19 |
|---|---|
| Android 메뉴 (0) | 2022.04.12 |
| 이벤트 처리 (0) | 2022.03.28 |
| android view2 (0) | 2022.03.25 |
| 사용자 인터페이스 기초 - 뷰 (0) | 2022.03.16 |
'프로그래밍/Android' Related Articles
more


Comments