
처음부터 차근차근
사용자 인터페이스 기초 - 뷰 본문
뷰와 뷰그룹
뷰
버튼, 텍스트 필드, 체크 박스 같은 것들이다.
View class를 상속받는다.
컨트롤 또는 위젯이라 불린다.
사용자 인터페이스를 구성하는 기초적인 블록이다.
View 클래스는 모든 뷰들의 부모 클래스
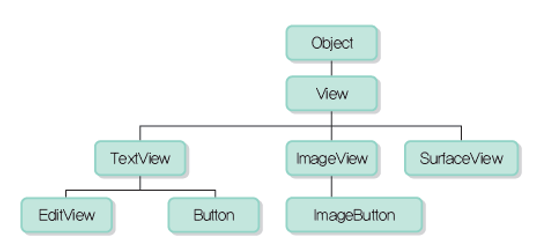
뷰그룹
뷰들을 담는 컨테이너이다.
ViewGroup class를 상속받는다.
레이아웃이라 불린다.
UI를 작성하는 절차
- 뷰그룹을 생성한다.
- 필요한 뷰를 추가한다.
- 액티비티 화면으로 설정한다.
<!--선형 레이아웃이라는 뷰그룹 생성 -->
<LinearLayout xmlns:android="http://schemas.android.com/apk/res/android"
    android:layout_width="match_parent"
    android:layout_height="match_parent"
    android:orientation="horizontal">

    <!--텍스트 뷰 생성-->
    <TextView
    	android:id="@+id/text1"
        android:layout_width="wrap_content"
        android:layout_height="wrap_content"
        android:textSize="24dp"
        android:background="#4CAF50"
        android:text="text1" />

    <!--버튼 뷰 생성-->
    <Button
    	android:id="@+id/btn1"
        android:layout_width="wrap_content"
        android:layout_height="wrap_content"
        android:textSize="24dp"
        android:background="#4CAF50"
        android:text="button1" />

</LinearLayout>
id : 뷰의 식별자
UI 작성하는 방법 2가지
- xml 사용
- 자바 코드 사용
되도록 자바 코드는 변경하지 않는다!
뷰의 크기 단위
px(pixels) : 픽셀.
화면의 실제 픽셀
장치마다 화면 밀도 달라서 되도록 권장하지 않음
dp(Density independent pixels) : 밀도 독립 픽셀.
화면밀도가 160dpi 화면에서 하나의 물리적인 픽셀을 의미한다.
장치의 밀도에 상관 없이 물리적으로 (거의) 동일한 크기를 갖는다.
따라서 서로 다른 화면 크기와 화면 밀도, 해상도를 가진 기기들에서 같은 모양의 UI를 제공하기 위해서는 dp를 사용해야 한다.
제일 권장함
sp(Scale independent pixels) : 스케일 독립 픽셀.
화면 밀도와 사용자가 지정한 폰트 크기에 따라 변환된다.
그래서 이 단위는 폰트 크기 지정할 때 사용되도록 권장한다.
pt : 1/72 인치 표시
mm : 밀리미터
in : 인치
색상
뷰에서는 색상을 16진수 RGB값을 넣는다.
#AARRGGBB A는 투명도!
#RRGGBB
뷰 화면 보이기 속성
visible : 화면에 보이게 함. 디폴트 값
invisible : 표시되지 않지만 배치에서 공간 차지
gone : 완전히 숨김
마진과 패딩
paddingLeft
paddingRight
paddingTop
paddingBottom
layout_marginLeft
layout_marginRight
layout_marginTop
layout_marginBottom
+ 텍스트뷰
android:typeface="serif"
글꼴을 serif로 지정
editText 속성
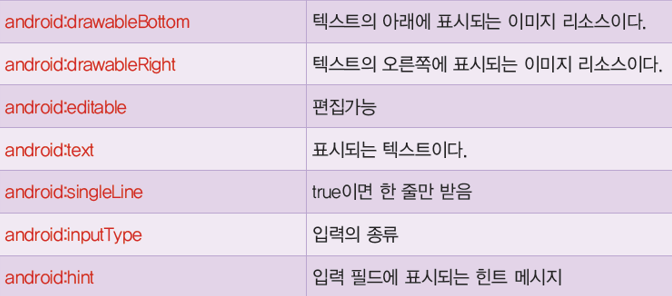
editText inputType 속성 값

예시
<EditText
	android:id="@+id/aa_editText"
	android:layout_width="wrap_content"
	android:layout_height="wrap_content"
	android:hint="아이디를 입력하세요"
	android:inputType="text" />

<EditText
	android:id="@+id/aa_editText_pwd"
	android:layout_width="wrap_content"
	android:layout_height="wrap_content"
	android:hint="아이디를 입력하세요"
	android:inputType="numberPassword" />
이미지 뷰
이미지 넣는 위치
res / drawable
예시
<ImageView
    android:id="@+id/imageView"
    android:layout_width="wrap_content"
    android:layout_height="wrap_content"
    android:src="@drawable/이미지이름(확장자빼고!)" />
Webview
앱에 웹을 띄우는 기능
레이아웃
뷰들을 화면에 배치하는 방법
레이아웃의 종류
- 선형 레이아웃
- 테이블 레이아웃
- 상대적 레이아웃
선형레이아웃
<LinearLayout ... />
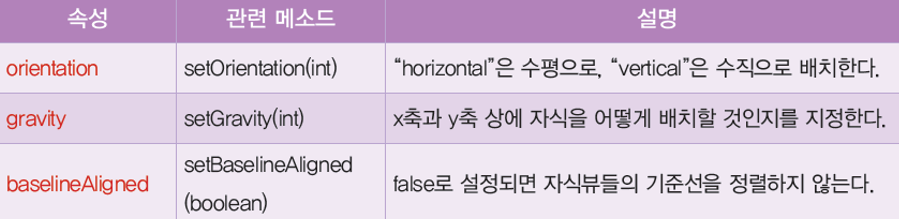
android:orientation="horizontal" : 자식을 수평(가로)으로 배치
android:orientation="vertical" : 자식을 수직(세로)으로 배치
예시
<LinearLayout xmlns:android="http://schemas.android.com/apk/res/android"
    android:layout_width="wrap_content"
    android:layout_height="wrap_content"
    android:orientation="vertical"

    <Button
        android:id="@+id/btn1"
        android:layout_width="match_parent"
        android:layout_height="wrap_content"
        android:onClick="btn_Click"
        android:text="변경" />

   <Button
        android:id="@+id/btn2"
        android:layout_width="match_parent"
        android:layout_height="wrap_content"
        android:onClick="btn_Click"
        android:text="변경2" />

</LinearLayout>
출처 : 안드로이드프로그래밍(22-1학기)김용남교수 강의 내용 변형 및 요약
'프로그래밍 > Android' 카테고리의 다른 글
| 리스너 객체 (2) | 2022.04.08 |
|---|---|
| 이벤트 처리 (0) | 2022.03.28 |
| android view2 (0) | 2022.03.25 |
| 애플리케이션의 기본구조 (0) | 2022.03.15 |
| 안드로이드 기초 (0) | 2022.03.14 |


