

처음부터 차근차근
android view2 본문
cordova
Apache 재단에서 지원하고 있는 하이브리드 앱을 제작하는 프레임워크이다.
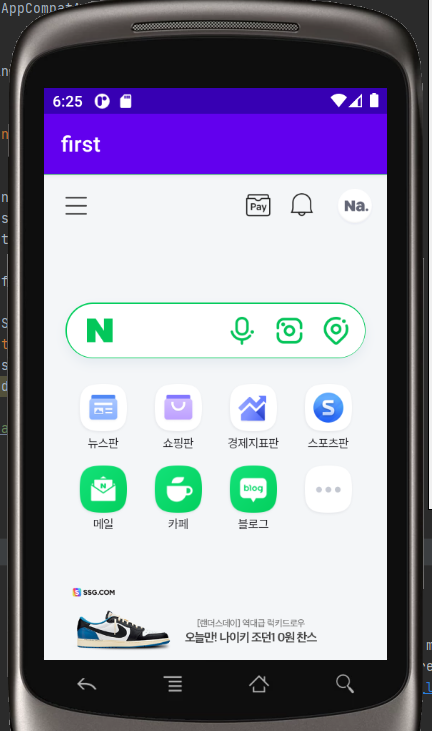
webview
webview 앱 내에 웹 브라우저를 넣는 것이다.
webview를 사용하면 앱 안에서 네이버나 구글같이 웹을 들어갈 수 있다.
activity_main.xml
<?xml version="1.0" encoding="utf-8"?>
<LinearLayout xmlns:android="http://schemas.android.com/apk/res/android"
    xmlns:app="http://schemas.android.com/apk/res-auto"
    xmlns:tools="http://schemas.android.com/tools"
    android:layout_width="match_parent"
    android:layout_height="match_parent"
    android:orientation="vertical"
    tools:context=".MainActivity">

    <WebView
        android:id="@+id/wvTest"
        android:layout_width="match_parent"
        android:layout_height="match_parent" />

</LinearLayout>
Androidmanifest.xml
<?xml version="1.0" encoding="utf-8"?>
<manifest xmlns:android="http://schemas.android.com/apk/res/android"
    package="com.induk.first">


    <uses-permission android:name="android.permission.INTERNET"/>
    <application
        android:allowBackup="true"
        android:icon="@mipmap/ic_launcher"
        android:label="@string/app_name"
        android:roundIcon="@mipmap/ic_launcher_round"
        android:supportsRtl="true"
        android:usesCleartextTraffic="true"
        android:theme="@style/Theme.First">
        <activity
            android:name=".MainActivity"
            android:exported="true">
            <intent-filter>
                <action android:name="android.intent.action.MAIN" />

                <category android:name="android.intent.category.LAUNCHER" />
            </intent-filter>
        </activity>
    </application>

</manifest>
MainActivity.java
package com.induk.first;

import androidx.appcompat.app.AppCompatActivity;

import android.os.Bundle;
import android.webkit.WebSettings;
import android.webkit.WebView;

public class MainActivity extends AppCompatActivity {

    @Override
    protected void onCreate(Bundle savedInstanceState) {
        super.onCreate(savedInstanceState);
        setContentView(R.layout.activity_main);

        WebView w = (WebView) findViewById(R.id.wvTest);

        WebSettings ws = w.getSettings();
        ws.setAllowFileAccess(true);
        ws.setAllowContentAccess(true);
        ws.setJavaScriptEnabled(true); //

        w.loadUrl("https://m.naver.com");
    }
}
결과화면
TableRow
<?xml version="1.0" encoding="utf-8"?>
<TableLayout xmlns:android="http://schemas.android.com/apk/res/android"
    xmlns:app="http://schemas.android.com/apk/res-auto"
    xmlns:tools="http://schemas.android.com/tools"
    android:layout_width="match_parent"
    android:layout_height="match_parent"
    tools:context=".MainActivity">

    <TableRow>
        <TextView android:text="주소" />
        <EditText android:text="서울시 종로구 120"/>
    </TableRow>

    <TableRow>
        <TextView android:text="이름" />
        <EditText android:text="김소영"/>
    </TableRow>

    <TableRow>
        <TextView android:text="확인" />
        <EditText android:text="저장"/>
    </TableRow>

</TableLayout>
gravity
gravity :
layout_gravity :
weight
weight :
layout_weight :
상대적 레이아웃

실습
<?xml version="1.0" encoding="utf-8"?>
<RelativeLayout xmlns:android="http://schemas.android.com/apk/res/android"
    xmlns:app="http://schemas.android.com/apk/res-auto"
    xmlns:tools="http://schemas.android.com/tools"
    android:layout_width="match_parent"
    android:layout_height="match_parent"
    tools:context=".MainActivity">

    <TextView
        android:id="@+id/textAddress"
        android:layout_width="match_parent"
        android:layout_height="wrap_content"
        android:layout_alignParentTop="true"
        android:text="주소를 입력하세요" />

    <EditText
        android:id="@+id/editAddress"
        android:layout_width="match_parent"
        android:layout_height="match_parent"
        android:layout_below="@id/textAddress"
        android:background="@android:drawable/editbox_background" />

    <Button
        android:id="@+id/btnCancel"
        android:layout_below="@id/editAddress"
        android:layout_alignParentRight="true"
        android:layout_width="wrap_content"
        android:layout_height="wrap_content"
        android:layout_marginLeft="10dp"
        android:text="취소" />

    <Button
        android:id="@+id/btnOk"
        android:layout_width="wrap_content"
        android:layout_height="wrap_content"
        android:layout_toLeftOf="@id/btnCancel"
        android:layout_alignTop="@id/btnCancel"
        android:text="확인" />


</RelativeLayout>
자바 코드로 레이아웃 만들기
super.onCreate(savedInstanceState);

LinearLayout l = new LinearLayout(this);
l.setOrientation(LinearLayout.VERTICAL);

Button one  =  new Button(this);
one.setText("One");

Button two = new Button(this);
two.setText("Two");

l.addView(one);
l.addView(two);

setContentView(l);
결과

이렇게 하면
public class MainActivity extends AppCompatActivity {

    @Override
    protected void onCreate(Bundle savedInstanceState) {
        super.onCreate(savedInstanceState);
        setContentView(R.layout.activity_main);

        Button one = (Button) findViewById(R.id.btnOne);
        Button two = (Button) findViewById(R.id.btnTwo);

        one.setText("_____");
        two.setEnabled(false);
    }
}
아래 버튼이 비활성화된다.
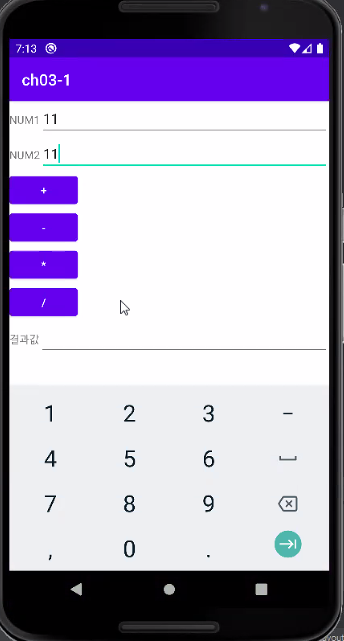
연산 프로그램
activity_main.xml
<?xml version="1.0" encoding="utf-8"?>
<LinearLayout xmlns:android="http://schemas.android.com/apk/res/android"
    xmlns:app="http://schemas.android.com/apk/res-auto"
    xmlns:tools="http://schemas.android.com/tools"
    android:layout_width="match_parent"
    android:layout_height="match_parent"
    android:orientation="vertical"
    tools:context=".MainActivity">

    <LinearLayout
        android:layout_width="match_parent"
        android:layout_height="wrap_content"
        android:orientation="horizontal" >
        <TextView
            android:layout_width="wrap_content"
            android:layout_height="wrap_content"
            android:text="NUM1" />
        <EditText
            android:id="@+id/edtOne"
            android:inputType="number"
            android:layout_width="match_parent"
            android:layout_height="wrap_content" />
    </LinearLayout>

    <LinearLayout
        android:layout_width="match_parent"
        android:layout_height="wrap_content"
        android:orientation="horizontal" >
        <TextView
            android:layout_width="wrap_content"
            android:layout_height="wrap_content"
            android:text="NUM2" />
        <EditText
            android:id="@+id/edtTwo"
            android:inputType="number"
            android:layout_width="match_parent"
            android:layout_height="wrap_content" />
    </LinearLayout>

    <Button
        android:id="@+id/btnPlus"
        android:layout_width="wrap_content"
        android:layout_height="wrap_content"
        android:onClick="plusCallback"
        android:text="+" />

    <Button
        android:id="@+id/btnMinus"
        android:layout_width="wrap_content"
        android:layout_height="wrap_content"
        android:onClick="minusCallback"
        android:text="-" />
    <Button
        android:id="@+id/btnMul"
        android:layout_width="wrap_content"
        android:layout_height="wrap_content"
        android:onClick="mulCallback"
        android:text="*" />
    <Button
        android:id="@+id/btnDivide"
        android:layout_width="wrap_content"
        android:layout_height="wrap_content"
        android:onClick="divideCallback"
        android:text="/" />
    <LinearLayout
        android:layout_width="match_parent"
        android:layout_height="wrap_content"
        android:orientation="horizontal" >
        <TextView
            android:layout_width="wrap_content"
            android:layout_height="wrap_content"
            android:text="결과값" />
        <EditText
            android:id="@+id/edtResult"
            android:inputType="number"
            android:layout_width="match_parent"
            android:layout_height="wrap_content" />
    </LinearLayout>


</LinearLayout>
MainActivity.java
package com.induk.first;

import androidx.appcompat.app.AppCompatActivity;

import android.os.Bundle;
import android.view.View;
import android.webkit.WebSettings;
import android.webkit.WebView;
import android.widget.Button;
import android.widget.EditText;
import android.widget.LinearLayout;

public class MainActivity extends AppCompatActivity {

    @Override
    protected void onCreate(Bundle savedInstanceState) {
        super.onCreate(savedInstanceState);
        setContentView(R.layout.activity_main);
    }

    public void plusCallback(View view) {
        EditText edtOne = (EditText) findViewById(R.id.edtOne);
        EditText edtTwo = (EditText) findViewById(R.id.edtTwo);

        int one = Integer.parseInt(edtOne.getText().toString());
        int two = Integer.parseInt(edtTwo.getText().toString());

        EditText edtResult = (EditText) findViewById(R.id.edtResult);
        String strResult = String.valueOf(one + two);
        edtResult.setText(strResult);
    }

    public void minusCallback(View view) {

    }

    public void mulCallback(View view) {

    }

    public void divideCallback(View view) {
        // 분모가 0이되면 안됨
    }
}
결과
출처 : 안드로이드프로그래밍(22-1학기)김용남교수 강의 내용 변형 및 요약
'프로그래밍 > Android' 카테고리의 다른 글
| 리스너 객체 (2) | 2022.04.08 |
|---|---|
| 이벤트 처리 (0) | 2022.03.28 |
| 사용자 인터페이스 기초 - 뷰 (0) | 2022.03.16 |
| 애플리케이션의 기본구조 (0) | 2022.03.15 |
| 안드로이드 기초 (0) | 2022.03.14 |
'프로그래밍/Android' Related Articles
more


Comments