

처음부터 차근차근
Swagger 본문
Swagger란
API Documentation & Design Tools for Teams | Swagger
swagger.io
Swagger는 웹 서비스 명세를 문서화 해주는 오픈 소스 소프트웨어 프레임워크이다.
즉, 웹 서비스가 어떤 로직을 수행하고, 이 로직을 수행하기 위해서는 어떤 값을 요청하며, 이에 따른 응답값은 무엇인지 정리해서 문서화해주는 프로젝트이다.
보통 웹 애플리케이션을 개발할 때 프론트 팀과 백엔드 팀으로 나누어서 개발을 하는데, 이 때 백엔드 팀이 만든 서비스를 swagger로 문서화해서 프론트 팀으로 넘겨 로직의 이해도를 높이고, 소통한다.swagger을 사용하면 개발과정 속에서 계속 변경되는 명세 문서를 알아서 주기적으로 업데이트해주기 때문에 번거로움을 없애고, 시간절약을 할 수 있다.
Swagger 실습
1. swagger 의존성 추가
gradle 기준으로 썼기 때문에 다른 빌드 도구 의존성을 추가하려면 아래 사이트를 참고한다.
https://mvnrepository.com/artifact/io.springfox/springfox-swagger2/3.0.0https://mvnrepository.com/artifact/io.springfox/springfox-swagger-ui/3.0.0
// springfox-swagger2
implementation 'io.springfox:springfox-swagger2:3.0.0'


// springfox-swagger-ui
implementation 'io.springfox:springfox-swagger-ui:3.0.0'
2. swagger 설정 코드 작성
기본 패키지 아래에다 config라는 패키지를 생성하고, 그 안에다 SwaggerConfig class를 생성한다.(class 이름은 변경해도 무관)
@Configuration
@EnableSwagger2
public class SwaggerConfig extends WebMvcConfigurationSupport {
    @Bean
    public Docket docket() {
        return new Docket(DocumentationType.SWAGGER_2)
                .apiInfo(apiInfo())
                .select()
                .apis(RequestHandlerSelectors.basePackage("com.ksy.noticeboard"))
                .paths(PathSelectors.any())
                .build();
    }

    private ApiInfo apiInfo() {
        return new ApiInfoBuilder()
                .title("게시판 API")
                .description("swagger를 이용한 게시판 api 문서입니다.")
                .contact(new Contact("김소영", "https://github.com/soyoungkimm", "ksoyoung@gmail.com"))
                .version("1.0.0")
                .build();
    }

	// resource mapping 끄지 않으면 안해도 됨(설명은 아래에)
    @Override
    public void addResourceHandlers(ResourceHandlerRegistry registry) {
        registry.addResourceHandler("/swagger-ui/*")
                .addResourceLocations("classpath:/META-INF/resources/webjars/springfox-swagger-ui/");
    }
}
docket은 swagger 설정의 핵심이다.
apiInfo()는 제목, 설명 등 문서에 대한 정보들을 보여주기 위해 호출한다.
그래서 매개변수로 api의 정보가 들어간 ApiInfo를 넣는다.
select()는 ApiSelectorBuilder를 생성한다.
apis()는 swagger에서 스캔할 패키지 범위를 RequestHandlerSelectors.basePackage() 메서드를 이용해 설정한다.
paths()는 apis()로 선택되어진 api중 특정 path 조건에 맞는 api들을 다시 필터링하여 문서화한다.
그래서 paths(PathSelectors.any()) 모든 경로가 문서화 된다는 뜻이다.
apiInfo부분의 contact는 개발자의 연락처이다.
기본형은 Contact(java.lang.String name, java.lang.String url, java.lang.String email)
이것이고, 차례대로 연락을 받을 이름, url, email을 넣으면 된다.
마지막에 있는 addResourceHandlers()를 WebMvcConfigurationSupport를 상속받아서 override하는 이유는 전에 썼던 글에 나와있다.
2022.09.08 - [Framework/Spring] - controller advice로 404 error 처리하는 법(gradle 사용)
resource mapping 설정을 꺼버렸기 때문에 swagger 문서가 조회되지 않아 추가한 코드다.
그래서 resource mapping을 따로 끄지 않은 사람은 이 함수를 override할 필요가 없다.
3. application.properties에 다음 내용을 추가한다.
# swagger
spring.mvc.pathmatch.matching-strategy=ant_path_matcher
추가하는 이유는 아래 글에 잘 정리되어 있다.
4. 결과
http://localhost:8080/swagger-ui/index.html 치면 url들이 문서화 된 것을 확인할 수 있다.

swagger 문서에 세부내용 추가하기
위의 과정까지만 해도 swagger을 이용한 api 문서가 만들어지기 때문에 이 부분은 굳이 하지 않아도 된다.
swagger에 세부내용을 추가하는 방법이다.
@ApiOperation
대상 api의 설명을 작성하기 위한 어노테이션
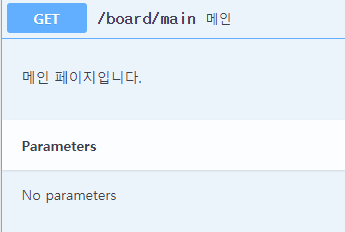
@ApiOperation(value = "메인", notes = "메인 페이지입니다.")
@GetMapping("/main")
public String home() {
    return "home";
}
value : url에 대한 설명
notes : url에 대한 자세한 설명
결과
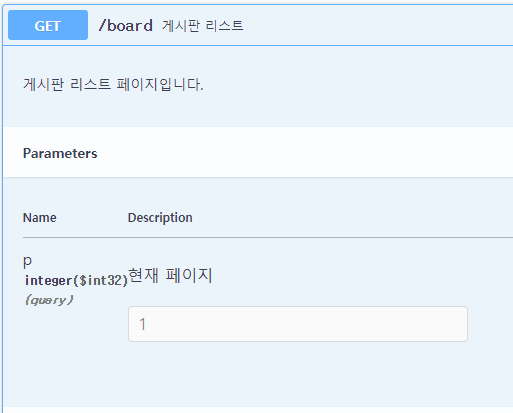
@ApiParam
매개변수에 대한 설명 및 설정을 위한 어노테이션
@GetMapping
public String list(Model model,
                   @ApiParam(value = "현재 페이지", example = "1")
                   @RequestParam(value="p", required = false) Integer p) {
    return "boards/list";
}
value : 파라미터에 대한 설명
example : 속성의 기본 값
또 넣을 수 있는 속성
required = true : 파라미터가 반드시 획득되어야 함
주의 사항
파라미터의 자료형이 int형인데 example 속성을 넣지 않으면 아래와 같은 경고가 뜬다.
illegal defaultvalue null for parameter type integer
java.lang.NumberFormatException : For input string: ""
매개변수 유형 정수에 대한 잘못된 기본값 null
java.lang.NumberFormatException : 입력 문자열의 경우: ""
매개변수 값이 없을 때 swagger에서 매개변수에다 null 값인 ""을 넣는데
""을 integer로 형변환 할 수 없어서 생기는 경고이다.
애플리케이션이 동작하는데는 문제가 없지만 고치는게 좋으므로
int형인 파라미터들은 모두 example 속성을 추가해서 기본값을 넣어주자.
결과
dto 객체를 매개변수로 사용할 경우 dto 클래스 내의 변수들도 정의할 수 있다.
예시
@PostMapping
public String create(@Valid Board board) {
    return "redirect:/board/{id}";
}
이런 식으로 매개변수로 dto를 받아도
public class Board {
    @ApiParam(value="글 id", example = "1")
    private int id;

    @ApiParam(value="제목", required = true)
    private String title;

    @ApiParam(value="내용", required = true)
    private String content;

    @ApiParam(value="작성 시간")
    private String writeTime;

    @ApiParam(value="조회수", example = "0")
    private int viewCount;

    @ApiParam(value="상태", example = "1")
    private int state;

    @ApiParam(value="작성자 id", example = "1")
    private int writerId;
}
dto 클래스에 ApiParam 어노테이션을 이용해서 정의해놓으면
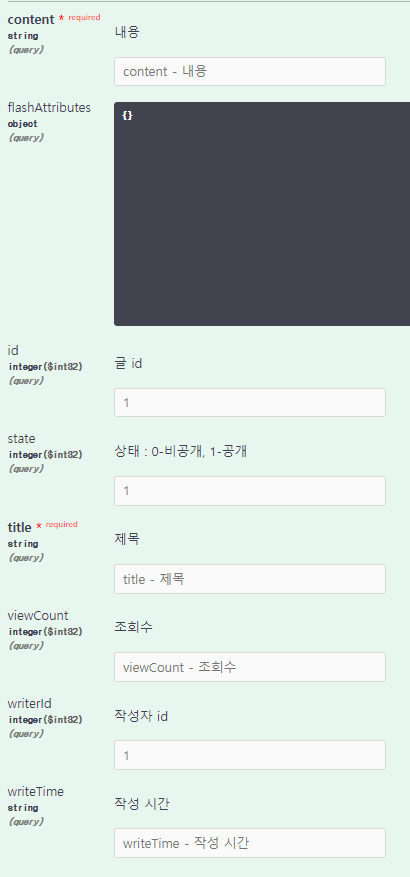
이렇게 문서에는 각각의 명세가 출력된다.
더 다양한 어노테이션에 대한 내용은 아래의 글을 참고하면 도움이 될 것이다.
https://velog.io/@gillog/Swagger-UI-Annotation-%EC%84%A4%EB%AA%85
[Swagger UI] Annotation 설명
Annotations Swagger 설정을 먼저 하고싶다면 여기글을 먼저 읽고 오면 된다. Swagger에서 API 설명을 위한 Annotation 들을 아래에 정리한다. @ApiOperation = Method 설명 @ApiOperation으로 해당 Control
velog.io
'Framework > Spring' 카테고리의 다른 글
| Logback : 로그 색상 수정 (0) | 2022.06.22 |
|---|---|
| @DeleteMapping과 @PutMapping (1) | 2022.05.24 |
| Logback (0) | 2022.05.05 |
| profile이용해서 bean 선택하여 사용하기 (0) | 2021.10.02 |
| evn객체 없이 외부 파일로 bean설정하는 법 (0) | 2021.09.23 |


