
처음부터 차근차근
날씨 API : OpenWeatherMap 본문
OpenWeatherMap는 날씨와 관련된 데이터를 제공해주는 API이다.
Сurrent weather and forecast - OpenWeatherMap
Access current weather data for any location on Earth including over 200,000 cities! The data is frequently updated based on the global and local weather models, satellites, radars and a vast network of weather stations. how to obtain APIs (subscriptions w
openweathermap.org
사용방법
1. 먼저 회원가입을 한다. (이메일만 있으면 할 수 있음)
2. api 탭으로 가서 사용할 data를 고른다. (필자는 current weather을 고름)

API doc로 들어가면 사용방법이 잘 나와있다!
3. js 코드를 이용하여 사용한다.
var apiURI = "http://api.openweathermap.org/data/2.5/weather?q="+지역이름+"&appid="+"자신의key";자신의 key를 복사하여 api 주소에 붙여 넣는다.


사용 예시
html
<div style="background-color : rgb(101, 178, 255); padding : 40px;color : #fff; height : 220px">
    <div style="float : left;">
        <div class="weather_icon"></div>
    </div><br>

    <div style="float : right; margin : -5px 0px 0px 60px; font-size : 11pt">
            <div class="temp_min"></div>
            <div class="temp_max"></div>
            <div class="humidity"></div>
            <div class="wind"></div>
            <div class="cloud"></div>
    </div>
    <div style="float : right; margin-top : -45px;">
        <div class="current_temp" style="font-size : 50pt"></div>
        <div class="weather_description" style="font-size : 20pt"></div>
        <div class="city" style="font-size : 13pt"></div>
    </div>
</div>
js
// 날씨 api - fontawesome 아이콘
var weatherIcon = {
'01' : 'fas fa-sun',
'02' : 'fas fa-cloud-sun',
'03' : 'fas fa-cloud',
'04' : 'fas fa-cloud-meatball',
'09' : 'fas fa-cloud-sun-rain',
'10' : 'fas fa-cloud-showers-heavy',
'11' : 'fas fa-poo-storm',
'13' : 'far fa-snowflake',
'50' : 'fas fa-smog'
};
// 날씨 api - 서울
var apiURI = "http://api.openweathermap.org/data/2.5/weather?q="+'seoul'+"&appid="+"자신의 key";
$.ajax({
url: apiURI,
dataType: "json",
type: "GET",
async: "false",
success: function(resp) {
var $Icon = (resp.weather[0].icon).substr(0,2);
var $weather_description = resp.weather[0].main;
var $Temp = Math.floor(resp.main.temp- 273.15) + 'º';
var $humidity = '습도 ' + resp.main.humidity+ ' %';
var $wind = '바람 ' +resp.wind.speed + ' m/s';
var $city = '서울';
var $cloud = '구름 ' + resp.clouds.all +"%";
var $temp_min = '최저 온도 ' + Math.floor(resp.main.temp_min- 273.15) + 'º';
var $temp_max = '최고 온도 ' + Math.floor(resp.main.temp_max- 273.15) + 'º';
$('.weather_icon').append('<i class="' + weatherIcon[$Icon] +' fa-5x" style="height : 150px; width : 150px;"></i>');
$('.weather_description').prepend($weather_description);
$('.current_temp').prepend($Temp);
$('.humidity').prepend($humidity);
$('.wind').prepend($wind);
$('.city').append($city);
$('.cloud').append($cloud);
$('.temp_min').append($temp_min);
$('.temp_max').append($temp_max);
}
})
// 날씨 api - 경기도
var apiURI = "http://api.openweathermap.org/data/2.5/weather?q="+'Gyeonggi-do'+"&appid="+"자신의 key";
$.ajax({
url: apiURI,
dataType: "json",
type: "GET",
async: "false",
success: function(resp) {
var $g_Icon = (resp.weather[0].icon).substr(0,2);
var $g_weather_description = resp.weather[0].main;
var $g_Temp = Math.floor(resp.main.temp- 273.15) + 'º';
var $g_humidity = '습도 ' + resp.main.humidity+ ' %';
var $g_wind = '바람 ' +resp.wind.speed + ' m/s';
var $g_city = '경기도';
var $g_cloud = '구름 ' + resp.clouds.all +"%";
var $g_temp_min = '최저 온도 ' + Math.floor(resp.main.temp_min- 273.15) + 'º';
var $g_temp_max = '최고 온도 ' + Math.floor(resp.main.temp_max- 273.15) + 'º';
$('.g_weather_icon').append('<i class="' + weatherIcon[$g_Icon] +' fa-5x" style="height : 150px; width : 150px;"></i>');
$('.g_weather_description').prepend($g_weather_description);
$('.g_current_temp').prepend($g_Temp);
$('.g_humidity').prepend($g_humidity);
$('.g_wind').prepend($g_wind);
$('.g_city').append($g_city);
$('.g_cloud').append($g_cloud);
$('.g_temp_min').append($g_temp_min);
$('.g_temp_max').append($g_temp_max);
}
})
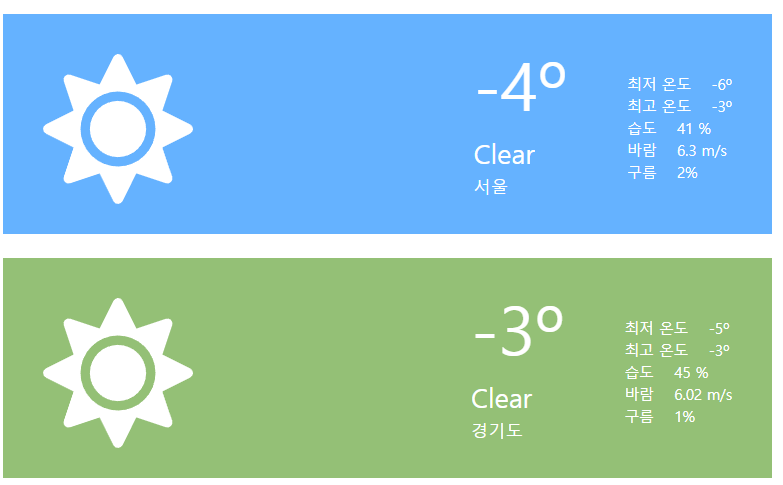
결과
참고 사이트 : https://byul91oh.tistory.com/31
'프로그래밍 > Javascript' 카테고리의 다른 글
| jquery로 :: before이나 :: after 같은 css 요소 변경하기 (0) | 2022.02.17 |
|---|---|
| 이미지 드래그 앤 드롭 업로드 구현 (0) | 2022.02.11 |
| jquery : Event.stopImmediatePropagation() (0) | 2022.02.06 |
| jquery click 이벤트 동적 페이지에 적용하는 법 (0) | 2022.02.05 |
| 별점 구현 (0) | 2022.02.04 |
'프로그래밍/Javascript' Related Articles
more


Comments